
In today's rapidly evolving business landscape, organisations are increasingly turning to cloud solutions to enhance their efficiency, scalability, and security. Sage is a popular choice for financial and business management software, and many businesses are exploring the possibilities of migrating their Sage On-Premise servers to the Azure cloud. This migration can be achieved using an IPsec tunnel and a VPN gateway. In this blog, we'll guide you through migrating your Sage On-Premise server to Azure, including installing Sage ODBC 32-bit drivers and utilizing Azure Modern Data Analytics.
Migrating your Sage On-Premise server to Azure offers several advantages, including:
1. Scalability: Azure provides the flexibility to scale your resources as your business grows, ensuring you can meet the demands of a changing workload. As your business grows, your computational and storage needs can easily expand without the limitations of on-premise hardware. This ensures you can handle a changing workload without major overhauls or hardware purchases.
2. Security: Azure offers robust security features to protect your data, including multi-factor authentication, threat detection, and encryption. Additionally, you can leverage Azure's security center to monitor and respond to threats effectively.
3. Cost Efficiency: Azure's pay-as-you-go model allows you to optimize your IT spending. You only pay for the resources you use, eliminating the need for maintaining expensive on-premise infrastructure. This cost-efficient approach can lead to substantial savings in the long run.
4. High Availability: Azure offers redundancy and failover capabilities, ensuring your Sage server remains available even during outages. This ensures your Sage server remains accessible, even during unexpected outages. Your business operations can continue without disruption, contributing to enhanced productivity.
Before you begin the migration process, there are several crucial steps to take:
1. Azure Subscription Setup: Make sure to choose the Azure subscription that best suits your Sage server's requirements. Azure offers a range of subscription types, including Pay-As-You-Go, Enterprise Agreement, and more. Selecting the right one will have cost implications, so consider your needs carefully.
2. Sage On-Premise Server Backup: Perform a full backup of your Sage On-Premise server to prevent data loss during migration.
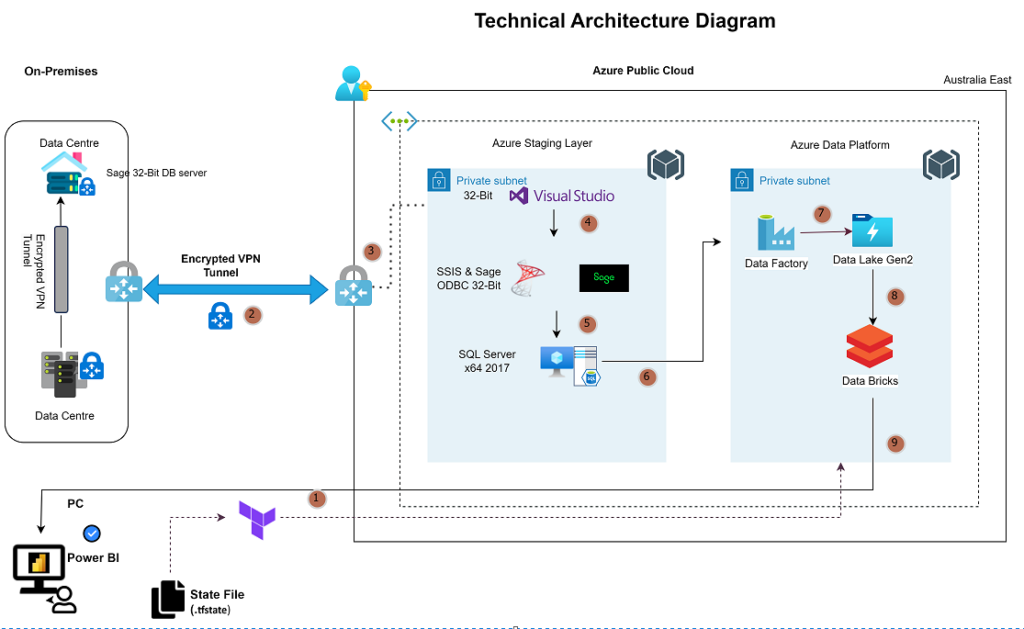
3. IPsec Tunnel and VPN Gateway: Setting up an IPsec tunnel and VPN gateway requires careful network configuration. You may need assistance from Azure experts or network engineers to ensure a secure and reliable connection between your on-premise network and Azure.
Make sure your LAN and Subnet address is correctly configured within on-premise network.
4. Sage ODBC 32-bit Driver Installation: The Sage ODBC 32-bit driver is a crucial component for connecting Sage to its database in the Azure environment. Ensure that it's compatible with both your Sage version and the operating system of the Azure VM.
1. Create an Azure Virtual Machine (VM): Using Azure Portal, create a Windows-based virtual machine (VM) with the necessary configuration and resources. Ensure it's in the same virtual network as the VPN gateway. While creating the Azure VM, consider factors such as the VM size, region, and the virtual network it belongs to. It's also a good practice to create a snapshot of the VM configuration for reference and potential future deployments.
Before you begin, ensure that you have the following prerequisites in place:
2. Establish VPN Connection: Configure the VPN connection between your on-premise network and Azure using the IPsec tunnel and VPN gateway. This will allow secure data transfer between your Sage server and the Azure VM. When configuring the VPN connection, pay close attention to security settings, including the use of strong authentication methods and encryption. Properly configure your on-premise VPN device to ensure seamless connectivity.
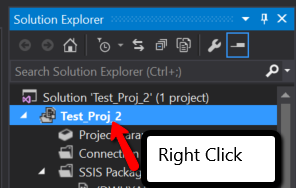
3. Domain Join: You will need administrative credentials in the on-premise Active Directory to join the Azure VM to the domain. Make sure you have the necessary permissions to perform this task.
Domain Join Procedure: To join the Azure VM to the on-premise domain, follow these steps:
Reboot VM: After successfully joining the domain, you'll need to restart the Azure VM to apply the changes.
4. Install Sage on Azure VM: Install Sage on the Azure VM by following the standard installation process. Ensure you select the same version of Sage as your On-Premise server. This includes any custom configurations, Sage modules, and user settings.
5. Install Sage ODBC 32-bit Drivers: To connect Sage to its database, install the Sage ODBC 32-bit drivers on the Azure VM. This can typically be done through the Sage installation package but verify compatibility and configuration settings to prevent connectivity issues.
6. Configure System DSN: To connect to the data source, configure system DSN by selecting the Drivers that you have added in the previous step, ensure to add the system DSN only, as this will help SQL Data pipelines to succeed. If you configure User DSN this will fail the data pipelines.
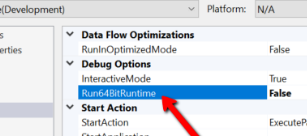
6. Install Vs Code 32-Bit: Visit the official Visual Studio Code download page (https://code.visualstudio.com/download) using your web browser. On the download page, you'll find options for Windows, macOS, and Linux. Look for a specific "32-bit" version of VS Code if available.
7. Install SSIS 32-Bit: You will need the installation media for the version of SQL Server that includes SSIS. During the installation process, you'll be prompted to select the edition of SQL Server to install. Make sure you select an edition that includes Integration Services (for example, SQL Server Standard, Enterprise, etc.)
8. Migrate Data: Migrate your Sage data from the On-Premise server to the Azure VM. Depending on your specific requirements, you can use Sage's built-in data migration tools or employ third-party migration tools. Data migration can be a complex process, depending on the volume and complexity of your Sage data. Choose a migration method that aligns with your needs and consider employing data validation tools to ensure data integrity.
9. Configuration and Testing: Configure Sage on the Azure VM to point to the correct database using the newly installed ODBC driver. Test the Sage application to ensure it functions correctly in the Azure environment. Extensive testing is essential to confirm that Sage functions correctly in the Azure environment. Pay close attention to database connection settings and verify that all Sage functions and modules are working as expected.
10. Data Sync and DNS Update: Implement automated data synchronization processes, such as Azure Data Factory or SQL Data Sync, to ensure that your Azure Sage instance remains up to date. Update DNS records to reflect the new Azure VM's IP address, ensuring seamless access for users.
11. Azure Modern Data Analytics: After migrating your Sage data, take advantage of Azure Modern Data Analytics to gain valuable insights. You can use Azure Data Lake Storage, Azure Databricks, and Power BI to perform advanced analytics, generate reports, and make data-driven decisions.
For more information: Modern analytics architecture with Azure Databricks - Azure Architecture Center | Microsoft Learn
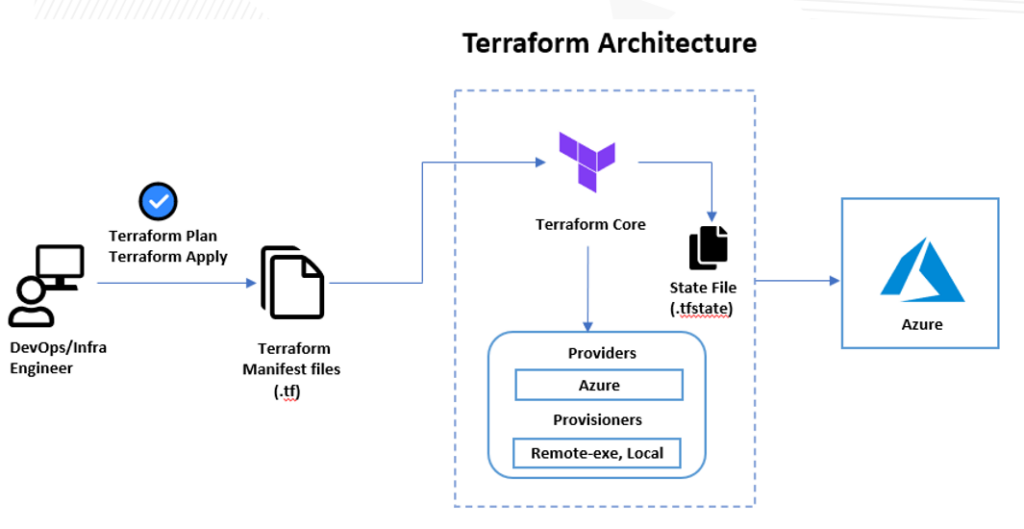
Deployed the Azure Modern Data analytics using Terraform:
Terraform is an open-source infrastructure as code (IaC) tool developed by HashiCorp. It enables you to define and provision infrastructure and services for your applications and environments using a declarative configuration language. With Terraform, you describe the desired state of your infrastructure in code, and Terraform takes care of creating, updating, and managing the resources to match that configuration.
For Rapid Delivery I have used Terraform to deploy the resources using the latest version of Azure Databricks.
For more information: Docs overview | hashicorp/azurerm | Terraform | Terraform Registry
12. Azure Data Factory: Azure Data Factory is a cloud-based data integration service provided by Microsoft as part of the Azure platform. It allows you to create, schedule, and manage data-driven workflows. Here are some key points about Azure Data Factory.
In order to connect from the Azure data factory to the on-premise SQL server you need to install and Configure Self-Hosted Integration Agent (Server has to be running 24*7). This will act as a bridge for connection. To successfully run your data pipeline in the Azure data factory you need to install the JRE drivers this will help to run your data pipelines in the Azure data factory.
For more information: Azure Data Factory - Data Integration Service | Microsoft Azure
13. Azure Data Lake Storage Gen2: Use Azure Data Lake Storage Gen2 to store and analyze vast amounts of structured and unstructured data. It provides advanced analytics capabilities and seamless integration with Azure's other data services.
Azure Data Lake Gen2 is connected to Azure Data factory to Sore your data. It has to be linked for the purpose of storage.
For more information: Modern analytics architecture with Azure Databricks - Azure Architecture Center | Microsoft Learn
14. Azure Data bricks: Azure Data bricks is a powerful data analytics and machine learning platform. It allows you to process, analyze, and visualize data at scale, making it an excellent choice for advanced data analytics and AI projects.
you can start creating clusters.
For more information: Azure Databricks | Microsoft Azure
15. Power BI: Power BI is a data visualization tool that helps you turn data into actionable insights. Connect it to your Azure data sources and create interactive reports and dashboards to make data-driven decisions.
For more information: Data Visualisation | Microsoft Power BI
16. Monitoring and Maintenance: Implement monitoring and maintenance routines to ensure the continued health and performance of your Sage system in Azure. Azure provides various tools and services for this purpose.
17. Regular Updates and Patches: Stay up to date with software updates and security patches for both Sage and the underlying Azure infrastructure to ensure the system remains secure and efficient.
18. Resource Optimization: Regularly assess your resource utilization in Azure and make adjustments as needed. You can scale resources up or down to match the evolving needs of your Sage application.
Migrating your Sage On-Premise server to Azure is a strategic move that can enhance your business's efficiency, security, scalability, and data analytics capabilities. By establishing an IPsec tunnel, configuring a VPN gateway, installing the Sage ODBC 32-bit drivers, and leveraging Azure Modern Data Analytics, you can seamlessly transition your Sage system to the cloud.
While the migration process may seem complex, the benefits are well worth the effort. Azure's robust infrastructure, coupled with Sage's powerful financial and business management capabilities and Azure Modern Data Analytics tools, can help your organization thrive in an ever-changing business landscape. Be sure to plan carefully, test thoroughly, and monitor your new Azure-based Sage system to ensure it meets your business needs effectively and drives data-driven decision-making.
Are you ready to demystify the cloud migration process and gain a clear understanding of the value it delivers for your business?
Discover how an Azure cloud data migration solution can help your business thrive—now, and for the future. Fill out the form to download the FREE eGuide.
Copyright © Tridant Pty Ltd.